Protein skimmer pumps typically have to function in a very harsh environment. The pin wheel picks up dirty water that contains proteinaceous waste and detritus whilst the air venturi and impeller are continually exposed to a mix or air and salt water that can form hard layers of Calcium Carbonate.
To make the pumps harsh life even harder small snails and sand may enter the pump and score the impeller and the impeller aperture. The main cause of lack of skimmer performance, pump noise or damage to pumps can be traced back to a lack of regular maintenance and cleaning of the pump and airline. In light of the number of emails asking for advice and help I have put together a check list and maintenance regime to help users self diagnose pump problems and also guide them as to how often each component of the skimmer pump will need to be cleaned.
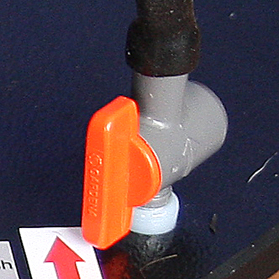
- Air tap (to be cleaned weekly)
The air tap is often over looked but is pivotal for correct functioning of the protein skimmer. As air is drawn in to the protein skimmer dust will collect in the air tap. Over time the dust will restrict the amount of air available to the protein skimmer pump. In acute instances the dust can almost block the air tap, this will cause the impeller to move forward and rub on the front suction plate. In time this action will damage the impeller pins and possibly cause the pump stator to over heat and wear the impeller shaft.
Protein skimmer performance will be reduced and very little foam will collect at the protein skimmer cup neck. The pump will also become noisy and vibrate To clean the tap remove it from the air line, open the tap and blow through the tap from the threaded end. This will blow out any dust and the tap can be returned to the airline. If the tap hasn’t been cleaned for some time the dust may have become solid within the tap and tap replacement may be required.Air tap
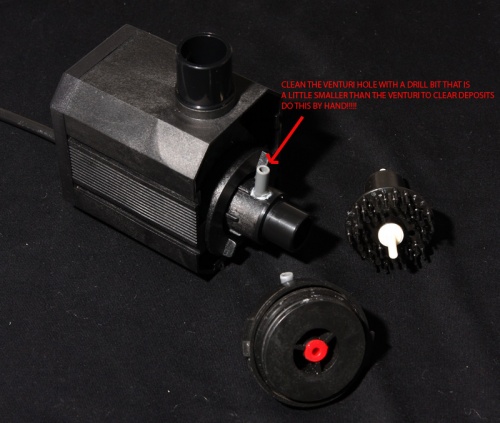
- Air venturi (to be cleaned monthly and flushed weekly)
Pump shown is from the MCE600
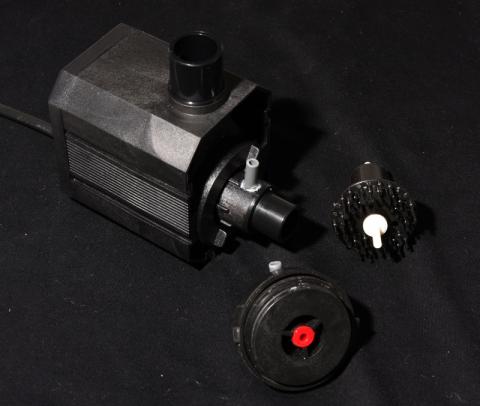
- Complete pump clean ( Every 3-6 Months)
Without regular cleaning Calcium carbonate deposits can build on the impeller shaft, within the impeller aperture and around the grommets at either end of the impeller. This can cause the impeller to stick on the shaft (old model pump), the shaft to stick within the ceramic bearings (new model pump) or the impeller to rub or stall within the narrowing impeller aperture due to the build up.
The pump will then overheat or damage will occur due to the shaft spinning within the rubber grommets (old style pump) or forcing the grommets to spin in their housings.
The pump should be stripped every 3-6 months and the pump soaked over night in an EzeClean or a 50/50 % solution of vinegar and warm water. This will break down Calcium Carbonate build up and after a clean with a brush and a rinse with RO water the pump will be ready for inspection (see below)
- Pump inspection (Every 3-6 months after a complete clean)
After cleaning the pump you should inspect the following components of the pump.
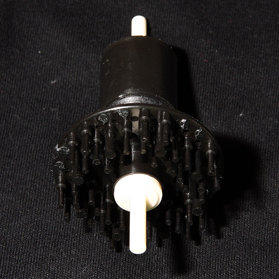
Impeller. Check the impeller surface for scoring, that the needle wheel is in good condition and that the shaft has no side to side slop within the impeller (old model pump). If the impellers plastic coating is scored down to the magnet the impeller will need to be replaced. This could have been caused by foreign objects such as sand or small snails that have made their way into the impeller well.
The impeller shaft should have very little play within the impeller (old model pumps) or within the ceramic bearings (new model pumps). Impeller shafts or ceramic bearings have a limited life and for best performance they should be replaced yearly.
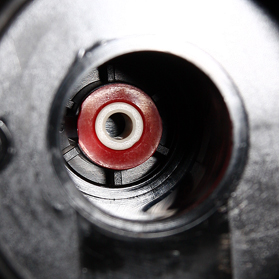
MCE600 Impeller in excellent physical condition
Motor/Stator.
With your finger check the inside of the impeller aperture for scoring and foreign objects. Remove any foreign objects and check that any scoring hasn’t breached the plastic within the stator. If the scoring has exposed the stator windings the stator will need to be replaced and should not be used.
Also check the grommet housings in the stator at the bottom of the impeller aperture and suction plate. If they are damaged due to worn grommets then the stator and or suction plate will need replacement. If the grommets are loose due to housing damage the pump will be noisy and the impeller may catch the inside of the impeller aperture.
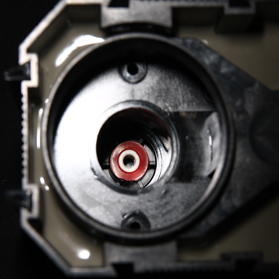
An unscored and clean stator impeller well
.
Grommets.
Ensure the grommets have been replaced with the upgraded red ones (Older Aquabee pumps) and that they are tight within the grommets housings. If the grommets are loose and the housings are in good condition they will need replacement.
As with the impeller shaft the grommets are best changed as a matter of course once a year. Grommets can shrink over time; this could result in the loose grommet damaging the grommet housings.
The grommets used for the new style pump have ceramic bearings built in. The fixed shaft used on the new style impellers spin within these bearings so check the bearings for free play on the shaft. If there is slop between the two the grommets with integrated bearings will need to be replaced. The replacement grommets can be obtained for little monies and insuring these are in good condition can offset more costly repairs due to worn grommets.
New style grommets installed in the stator impeller well and the suction plate

Flow flap. The Aquabee pumps are AC pumps and as such when they start the impeller may rotate in either the clockwise or counter clockwise direction. To correct the flow dynamics within the pump depending on the start direction Aquabee have installed a small flap just inside the outlet of the pump. This flap must be free to move left or right without resistance so it can direct the flow correctly.
If the flap is stuck the pump duty will be reduced so ensure that the flap is free and clean.
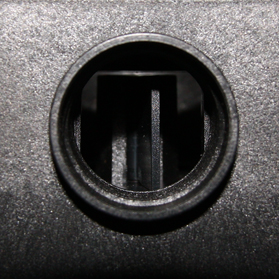
flap in central position looking in from the output side of the pump
I hope you have found this article to be informative, remember a well maintained pump will provide many years of trouble free service.
You may also want to read this article if you need know if your pump is of the old or new design.
Tony