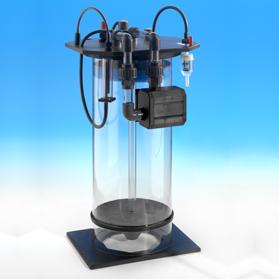
If you find yourself a little lost after unpacking your new calcium reactor you may well find the step by step guide below quite useful .Fear not calcium reactors are quite simple to set up so dont let all those spiralling pipes confuse you...all will become clear!!
I will be using a PF601s for this article but all other PF reactors within the range will be similar.
Step 1
Unpack the reactor and check all components for damage
Step 2
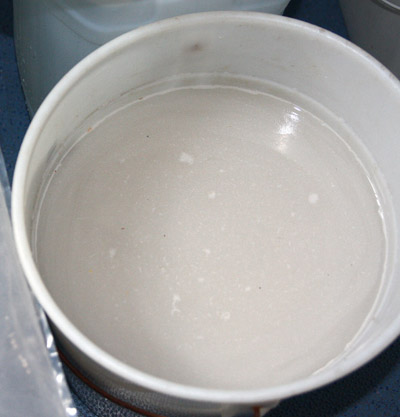
Before you turn your attention to the reactor itself i advise you wash the reactor media. I hear you all mumble 'boring!!' under your breath but you may as well get it out of the way now rather than halfway through assembly.
The majority of calcium reactor media's only get an initial pre wash before being packed and this results in the media being rather dusty from the bag, transport vibration will also cause clean media's to rub together and produce dust so its always wise to wash the media well before use.
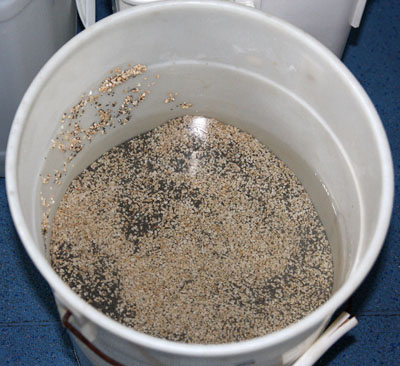
Empty the media so it fills around 1/4 of a salt bucket and wash well with a hose pipe, when the media runs clear swap it out with another batch untill the correct amount for the reactor is clean.
Now place all the media into a bucket of RO water to rinse out the tap water that may contain high Nitrate and Phosphate.
Leave this for a few hours then drain well, the media should now be ready for use.
Before After
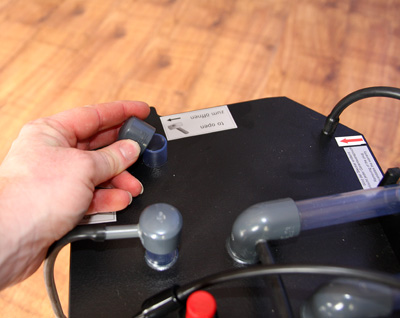
Step 3
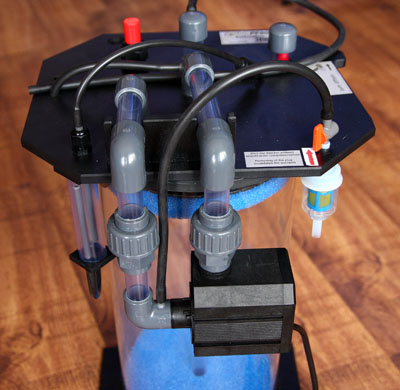
Remove the lid of the reactor in an anti-clockwise direction and check the sponges are in the correct position, the coarse blue sponge should be at the bottom of the reactor and the finer at the top to prevent fines from entering the pump.Now remove the fill cap from the lid of the skimmer and place it on the end of the long recircualtion pipe that runs down to the perforated plate at the bottom of the skimmer. The cap will prevent media from dropping into the pipe when filling and blocking the plate from underneath when running.
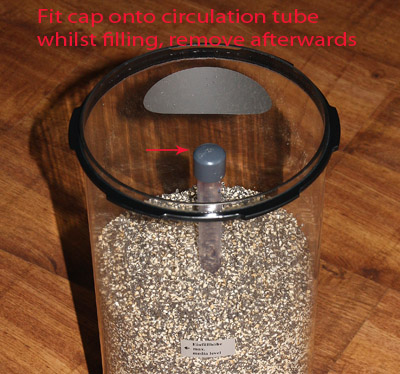
When filling the reactor with media keep the pipe straight as you add the media so it doesnt lean off center, fill with media to the fill level label on the side of the body and when done hold the clear pipe in place with one hand and pull off the cap. If you dont hold the clear pipe you could pull it out of the reactor body whilst removing the cap and media will fall into the the hole in the perforated plate below and you will have to empty and start over.
Step 4
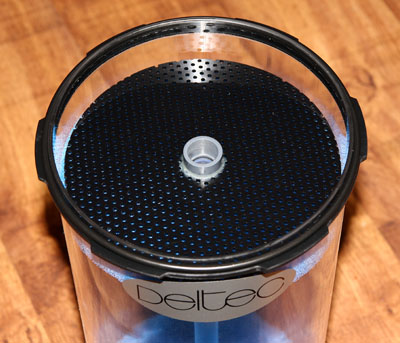
Now you have filled the reactor position it and fill the body of the reactor with aquarium water up to around 3 inches to the top of the clear body. Now fit the finer blue sponge onto the perforated plate that sits on top of the clear recirculation pipe and fit it (sponge down) onto the pipe.You can now fill the body of the reactor almost to the top without fear of displacing and spilling water due to fitting the sponge. Poor the water down the center hole rather than through the perforated plate as this may move the sponge that sits under the plate out of position.
Now align the bayonet on the lid with the body of the reactor and turn it clockwise to engange the bayonet.The center pipe under the lid (pump out flow)should also align with the top perorated plate and drop into it. When you feel the lid grip the o-ring turn the lid a couple more degrees and it should be water tight, there is no need to over tighten the lid and this could actually break the bayonet. Make sure there is no debris from the media on the o-ring before you replace the lid as this will break the seal, a light smear of slicone grease around the o-ring will help with installation and produce a better seal.
Dont expect the lid shape to line up with the shape of the foot, this is a design detail of the lid and you could overtighten the lid by trying to rotate it to align squarely with the foot.
Step 5
Now the reactor is in place and full with water and media its time to connect up the pipework. The first job will be to connect up the feed water pipe to the reactor. You can feed the reactor by either using a peristaltic pump, T off an existing pump,run a supply from a small pump via an adaptor or gravity feed it from the main tank.
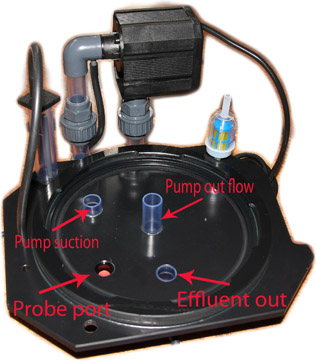
The pipe from the feed pump will need to be connected to the filter that sits under the lid(as pictured above) , if using a peri pump you can remove the adjustment tap that sits on top of the lid above the filter if you wish as the peri pump will control the flow rate.For all other pump applications you should use the tap to control the effluent rate at the inlet side. Do not attempt to install a tap on the outflow side of the reactor as this may pressurise reactor and cause it to leak.
The inlet pipe runs directly to the recirculation pump, the pump then forces the new feed water to the bottom of the reactor and through the media so no feed water ever escapes to effluent without running through the media....which is nice.
After some time the filter may become blocked, this can be replaced with a new filter or removed if there is little chance of sand or foreign objects being sucked into the feed and then into the pump on the reactor as this will damage it.
The effluent out pipe can now be run back to the sump from the reactor, i would advise you do not submerge the pipe as you will not be able to observe the drip rate from the reactor. Run the water back to a high flow section of the sump to help blow off any CO2 in the effluent and help promote a rise in local Ph.
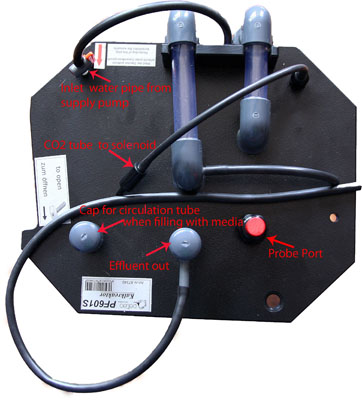
We can now move onto rigging up the CO2 pipework, you should have your CO2 cylinder,gauges and solenoid in place so you simply run a length of pipework from the solenoid to the CO2 non return valve on the reactor. The non return valve prevents water from pushing back from the reactor and into the bubble counter when the solenoid/CO2 is switched off. The water would then continue to travel up into the solenoid and gauges and damage both so its most important the valve is in place,working and installed the correct way around. The gauges should be set to around 1-1.5 bar on the secondary gauges.
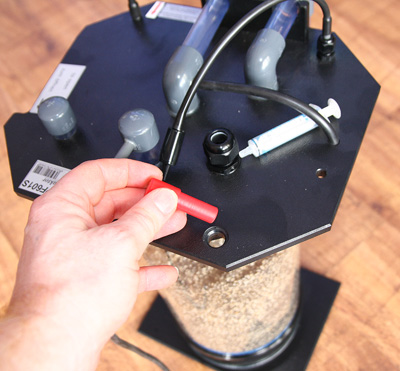
If you wish to place a Ph probe into the lid of the reactor to control or monitor the internal Ph then loosen the domed black plastic nut on the Ph port and remove the red blanking plug. There is a hole in the lid where you can place the plug for storage. Push the probe into the port carefully until you feel it come in contact with the perforated plate now pull it out by around 20mm to clear the plate. Now hand tighten the black port nut, this will compress the built it o-ring around the probe for a water tight seal. Be sure you do not push the o-ring into the port when installing the probe as the port will leak if you do!!!
The PF509 reactors do not come with a Ph port but if you wish you can run the effluent into a small vessel containing a Ph probe and allow the vessel to overflow back into the sump.
Step 6
Now with the pipework connected you will need to make final adjustments before running for the first time. Remove the the soft black silicone pipe at the non return valve and top up the bubble counter with RO water, i used a syringe for this.
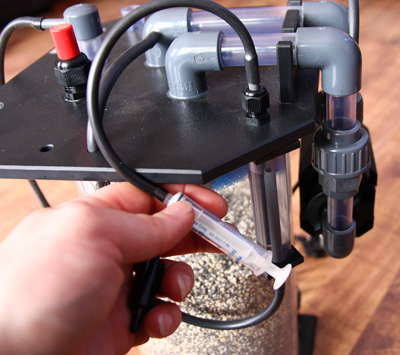
Reconnect this pipe and check all connections are tight, now open the little red inlet control tap fully and turn on your feed pump. Leave the reactor recirc pump off for now and run the pump until water starts to run from the effluent pipe. Give the reactor a bit of a shake to force any trapped air to the top and wait for all the air to escape from the effluent pipe.
When the reactor is clear of air turn on the recirculation pump, if using Rowalith C+ media the media should start to slowly fluidise within the reactor. I have used large coral skeleton in the PF601s( 20-30mm) with excellent results, dont expect this to fluidise though.
Now reduce the effluent flow to around 30 drips per minute and the bubble rate to around 15 bubbles per min and refer to the following pages to tune the reactor for best output.
http://www.theaquariumsolution.com/setting-deltec-calcium-reactor
http://www.theaquariumsolution.com/setting-calcium-reactor-ph-controller
I hope this guide will be useful when setting up your new reactor for the first time.
Tony