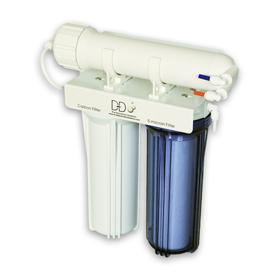
RO units, not the most interesting or aesthetically pleasing bits of kit but if you require super high quality water for your aquarium they are invaluable and pretty much a must have if running a reef aquarium.
Hobbyists are often put off from purchasing an RO unit due to the seemingly complex installation; this is actually quite simple with no need to sign up for a city and guilds in plumbing. To help guide you I’ll be installing a D-D RO unit for this article and taking pictures as I go to help you visualise exactly what I have done.
What is RO and what’s with the three pipes?
Ro membranes are tightly wound semipermaeable films, tap water is applied under pressure to one side of the membrane, pure water will then pass through the membrane due to osmotic pressure and exit at the clean side of the membrane. Dirty water containing a high concentration of Total dissolved solids (TDS) that are too large to pass through the membrane will then run too waste as the solids collect and are washed away at the dirty side of the membrane.
The rejection rate for the dirty to clean water is around 4 dirty – 1 pure water depending on your mains water pressure. The higher the mains water pressure the more efficient the unit will become as greater pressure will be applied to the membrane. The ideal mains water pressure for our RO systems is around 50-70 psi, if your mains water is under 35psi it may be too low to pressurise the membrane sufficiently and you may require a booster pump which can also be purchased from D-D.
So what’s with the pipes again?
1. The white water supply pipe- this connects to the mains to supply the unit with tap water at mains pressure
2. The blue product water pipe- this needs to be placed in the collecting vessel as pure water will exit this pipe
3. The orange waste pipe- This pipe will need to go to the waste water plumbing as dirty water with a high TDS concentration will exit this pipe; the flow restrictor/flush unit will need to be fitted inline.
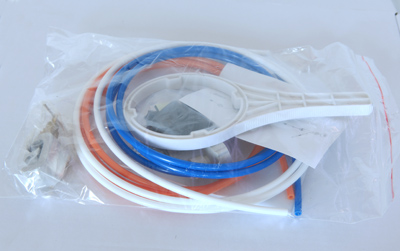
What's in the box?
On opening the box you should find the main unit fitted with the sediment and carbon filters, a sealed RO membrane that will need installing when the system is ready to roll, instruction sheet and a bag containing.
1. 3 lengths of colour coded RO tube (white, blue and orange)
2. Self tapping mains tap
3. Optional garden tap connector
4. Waste saddle clamp
5. Flow restrictor flush valve
Other tools you need to source yourself include a small adjustable spanner, piece of sand paper for cleaning the paint from a copper pipe and PTFE tape available very cheaply from any of the DIY supply stores at the plumbing section.
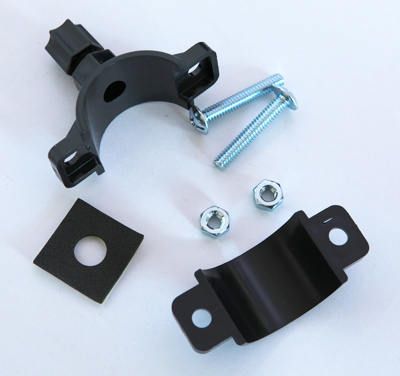
Bag of tricks
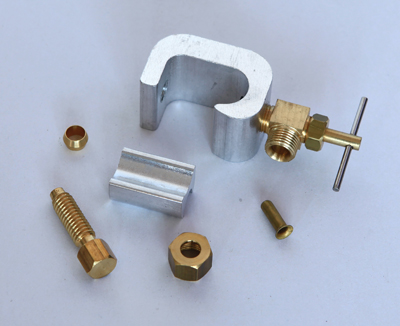
Fitting the self cutting supply tap
First turn off your mains water, this isn’t absolutely necessary but always good practice when adapting any mains water plumbing. The main stop cock is usually found under the sink but can be sited elsewhere depending on the dwelling.
Now we need to assemble the tap, the tap includes the main body and tap, clamp adapter for 9-15mm pipe(most copper pipe is 15mm), clamp bolt, RO tube insert, RO tube sealing olive, RO tube fixing nut .The pictures below show the unit as individual components and assembled for 15mm mains pipe.
Tap components Complete
Now locate an area of pipe along your mains cold water pipe close to a waste pipe (under a sink is ideal) where you can easily install the self cutting tap. If the copper pipe is very close to the wall you may not get the tap in place so place the tap close to the sink where the pipe should be routed away from the wall.
DON’T TAP INTO THE HOT WATER PIPE BY MISTAKE!!
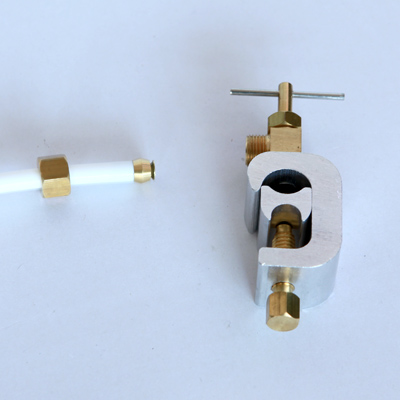
Loosely fit the tap clamp to the pipe and slide it out of the way and clean the area of copper pipe that will be pierced by the tap and clean away any paint or corrosion with fine sand paper that may prevent a good seal. You will note that there is a small rubber gasket that is located at the self piercing tip. Wind the self piercing tip out as far as you can and now clamp the tap to the pipe using a spanner so that this gasket will seal against clean pipe work as the clamp is tightened. This will prevent water leaking out of the junction between the tap body and copper pipe once a hole is made.
Now screw in the self tapping tip using the bar as far as you can, the tip will pierce the copper pipe creating a hole. When the tap is wound out water will flow through the body and down the white RO tube.
As I mentioned earlier it’s best to turn the mains stop cock off whilst you do this as if you forget yourself and open the tap whilst the RO unit isn’t connected you’re going to get rather wet.
Tap fitted to copper pipe (mains cold feed)
When fitting the RO pipe to the tap be sure to fit the copper coloured top hat shaped insert pictured above (tap components image).When the nut is tightened the copper olive on the RO pipe will compress and may not seal unless the insert is fitted to prevent the RO tube from being squashed.
The kit also comes with a white plastic compression olive for softer pipe work (not pictured) but i find the copper olive works well on RO pipe.
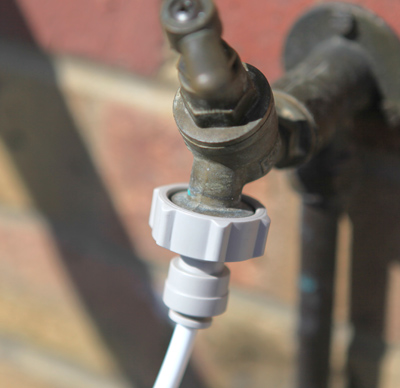
You may also install the unit via the garden tap connector provided, this will also fit certain washing machine style taps. You may find that some washing machine style taps threads don’t quite match those of garden taps for which the connector was designed leading to the connector leaking, as a work around you can add another thick rubber washer inside the connector (not supplied, a tap washer should do) , you should then find the connector seals before binding on the slightly differently pitched threads of the washing machine tap. The connector fits garden hose taps perfectly.
Outside tap connector
A word about frost and installing the unit outside.
You can install the unit outside in a small insulated shed but be wary of the fact that if the outside temperature drops below 0c the water within the unit could freeze,expand and crack the pods or membrane housing. Always bring the unit inside or drain it (keep the membrane wet) when there is a chance of freezing temperatures.
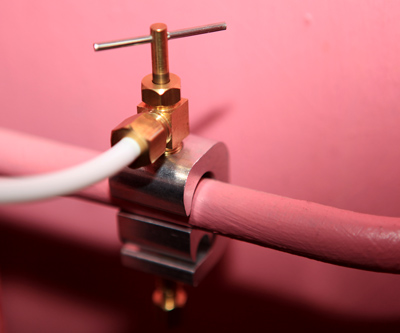
Connecting the waste saddle clamp.
The saddle clamp connects to your waste pipe under your sink, please see the pictures below for assembly. Give the waste pipe a clean to get a good seal between the pipe and saddle clamp foam. Drill a 6mm hole in the top of the waste pipe and position and tighten the clamp so the RO pipe connector sits over the top of the hole.
The saddle clamp is now installed, now all you have to do is slip the black plastic nut from the RO connector of the saddle clamp over the orange RO pipe, push the pipe into the connector and tighten the nut by hand.
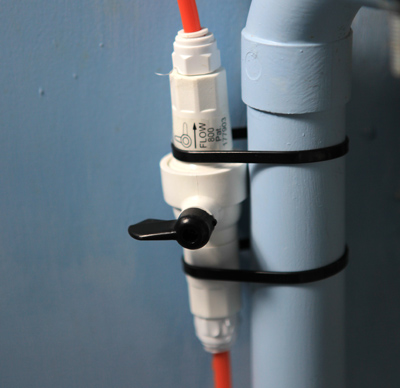
Installing the flow restrictor/flush valve
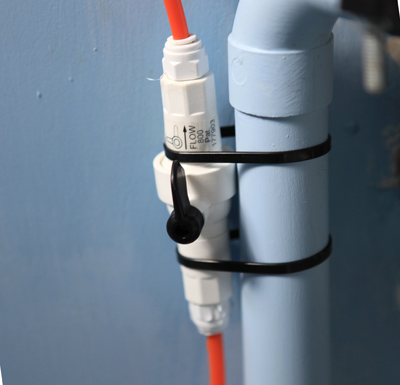
The flow restrictor needs to be placed inline within the run of orange waste water pipe from the ro unit. The restrictor is directional so needs to be installed in the direction of flow printed onto the restrictor body. The job of the restrictor is to restrict the outflow of the waste water, this will pressurise the membrane and product water will start to exit the blue pipe. The restrictor must be in the closed position (90 degrees to the restrictor) as pictured below to produce water and open to flush the unit (inline with the restrictor body)
Restrictor closed for water production Restrictor open for flushing the unit only
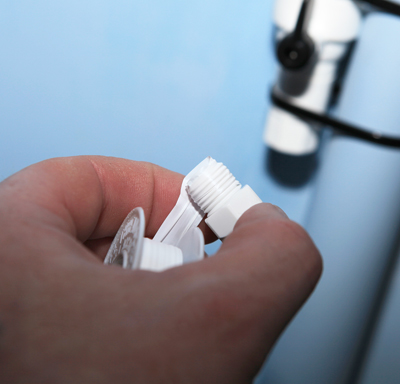
Before the restrictor can be installed the end connectors of the restrictor will need to be sealed with PTFE tape to prevent any leaking at the threads (see images below). Once the threads have been sealed the orange RO waste pipe can be cleanly cut and pushed firmly into each end of the restrictor taking note of the flow direction.
To remove the RO pipe from the unit push the small collar around the push fitting/ro pipe inwards towards the restrictor whilst pulling on the RO pipe to release the internal teeth of the push fit connector that hold the RO pipe into place.
PTFE the threads Screw in the end connectors

Installing the main unit…nearly done!
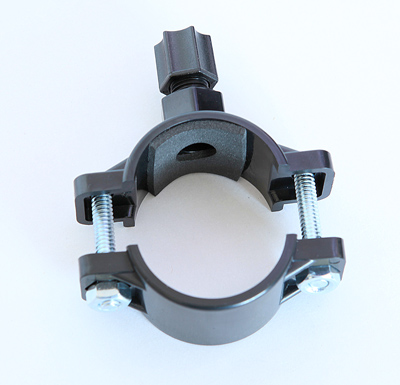
Now we have installed the water supply tap, waste saddle clamp and flow restrictor it’s time to install the main unit. You can sit the unit directly on the floor or mount it to the wall or other solid structure via the hangers on the back of the pod bracket.
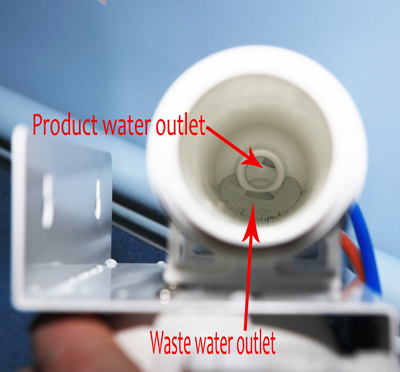
Now it’s simply a matter of routing the RO pipe that you have already installed already and push fitting into the main unit. The membrane housing will come with small colour coded pieces of RO tube so to let you know where each pipe should be connected.
If the pipe samples are misplaced the product water pipe push fitting sits above the waste pipe push fitting, I have included an image of the internal of the membrane housing should you be in any doubt as to where each exits internally.
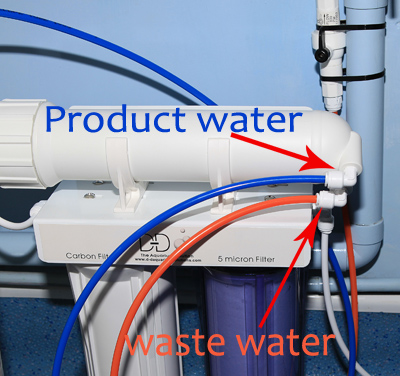
If you wish to cut the RO pipe work down do this cleanly and squarely then push the orange, blue and white pipes into the appropriate push fittings. The blue pipe will need to be run from the RO unit to your product water collecting vessel.
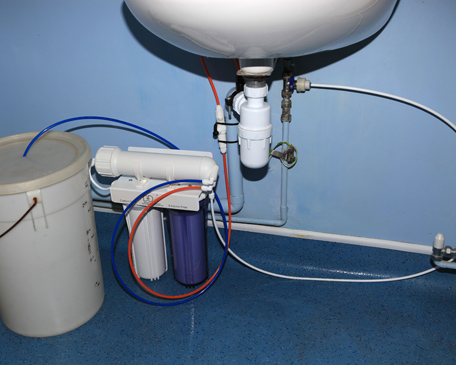
Unit installed
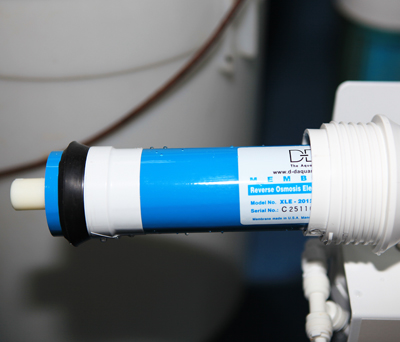
Installing the Membrane and first run.
Before installing the membrane you should turn the mains water and run the unit without the membrane for around 10 minutes with just the sediment and carbon filters installed. The reason for this being that small fines can exit the carbon filter for the first run and these can find their way into the membrane. This step isn’t absolutely necessary but good practice; the fines should be washed away with a good flush of the membrane if you don’t follow this step.
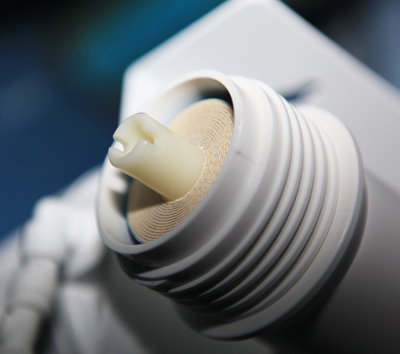
Now turn the water feed off to the RO unit and unscrew the end cap of the membrane housing, removing the RO pipe from the end cap will make this easier. Remove the membrane from the wrapping and install it as per the images below making sure it’s located snugly. Now screw on the end cap and refit the RO pipe to the end of the cap.
Installation is now complete and you should run the unit to produce at least 5 gallons of water that should be disposed of before the product water can be used to, this will wash out any preservative agents used to keep the membrane in good condition whilst packaged.
To finish a quick FAQ
Q Do i have to keep my membrane wet?
A Yes, if the membrane dries out it will be damaged, when not in use lift the product water pipe above the outlet so the unit cant drain.If stored for long periods install taps on the RO pipework so you can isolate the unit so water cant drain or evaporate. Give the unit a good flush or run weekly to keep it free of bacterial build up regardless.
Q Do i have to run my RO unit 24/7?
A No this is an urban myth, just ensure the membrane cant dry out as above if not used for a while.
Q The product water is dribbling out of the blue pipe but water is squirting out of the waste pipe.?
A This is normal, remember the ratio of waste to product is around 4-7 waste to 1 product water depending on mains pressure. Make sure your flush valve is in the off position as if not all water will flush to waste with little or no product water being collected.
Q How do i know my product water is of good quality.?
A You can test the quality of the product water using a TDS(total dissolved solids) hand held meter, more info on the D-D TDS meter can be found here: Click me
Q Can i increase the quality of the water for absolute 0 TDS?
A You can include a Di pod in addition to the RO unit if you wish to achieve 0 TDS if your mains water quality is very bad as RO units typically remove 98% of TDS and if the TDS of the mains water is very high you may wish to reduce this further. More info can be found here Click me
Q My product water slows down in the winter, is this right?
A Yes this can be true, low water temperature can effect production speed.
Q My water production rate is very slow regardless of temperature and when i run the taps in my house water isnt in any real hurry, what can i do about my mains pressure?
A If you suffer from low water pressure you can install a booster pump.This is very simple and all you need to do is break into the white RO supply pipe to install the booster pump inline and plug it in, your RO production should then increase by some margin. More info can be found here Click me
Q Can i leave my RO unit running and unattended?
A This isn't a great idea unless the collecting vessel can run to waste if it over flows, unattended RO units = soggy carpets and angry wives.
Q How often should i change my filters?
A The sediment and carbon filters should be changed every 3-6 months depending on the quality of your tap water, the carbon filter protects the membrane from chlorine damage and the sediment prevents the membrane from premature blocking. The membrane should be changed out every 2-3 years depending on use and TDS readings
Q How often should i flush?
A I would advise a flush for 10 mins every 2 weeks if the unit is used heavily , once a month should be fine for units that are used lightly.
Q Can i change the membrane for one with a higher rating?
A Yes you can, D-D can supply larger capacity membranes. You will need to change out the restrictor as these are rated differently and paired to specific capacity membranes so order the higher capacity membrane and restrictor as a matching pair.