Before installing your rail kit you will need the following.
Tools:
Crosspoint screwdriver, large head standard screwdriver.
Other requirements:
For ceiling mounting of the rail you will need to have a pair of screws or mounting fixings that are suitable for use with the SOL WIRE 03 hanging kit and also for the type of ceiling that you are fixing into.
Contents:
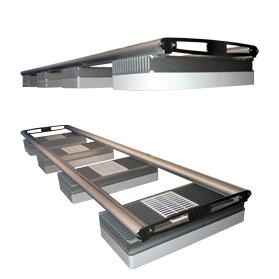
The SOL RAIL hanging kits consist of 2 x lengths of special aluminium section, 2 x stainless steel end plates, lengths of sealing strip and a bag of stainless screws.
Options:
-
For ceiling hanging of the rail you will need a SOL WIRE 03 hanging wire kit
-
For tank mounting of the rail you will need a set of SOL FEET
Assembly:
1 - Take the two aluminium rails from the tube and position the so that the cable management slot is to the inside of the two rails at what will become the front and at the outside of what will be the back rail.
2 - Take one of the stainless steel end plates and, being careful not to scratch it, screw to one end of both rails using 4 of the fastenings supplied. It is important to use the correct sized screwdriver for this operation as you need to self tap the threads into the aluminium. If you do strip the head on a screw then there are two spare in the pack.
3 - Turn the frame upside down on the floor and unpack the lights from their boxes. On the top of each light there are 2 screws which must be partially unloosened to allow the to slide easily onto the bottom slot of the rail. I found that about 3 full turns was about right so that the light slides easily onto the track but was not too loose.
4 - Slide the lights upside down onto the rails with the data port end towards the back of the frame and position them with their approximate correct spacings.
5 - Take the sealing strip and for each SOL cut 4 lengths about 2cm long. Push these lengths into the slot on the bottom of the frame and slide them from both sides into close contact with the light. This will hold the light into position and take up any slack in the screws. It also means that if you tip the lights from one end that the modules will not all slide to the other end.
6 - Take the power supplies and plug them into the power port on each SOL light and then lead the cable along the cable management slot on the back of the frame to the end where you intend to run to the mains. Remember that at this point the frame is upside down and so it is the opposite end.
7 - Next take the short data leads and plug them into one port of the first SOL then along the cable management slot to the next SOL and so on for each light.
8 - Cut lengths of the sealing strip so that they are about 2 cm longer at each end than the gap between the light modules. Starting from the centre push the sealing strip into the aluminium section and work out to the ends until they are fitted flush. At the end where the cables come out leave a gap as on the photo. There is no need to put any of the seal into the front cable management slot.
TOP TIP: Put the sealing strip in a microwave for 1 minute to soften it an make it easier to install.
9 - If fitting feet onto the rail then this can be done at this stage and the screws on the feet tightened up during final positioning.
10 - If fitting the wire suspension kit then turn over the light rail and slide the balls on each wire down the slot at the top of the aluminium section before finally screwing on the other end plate. Take the cup on the ceiling fixing part of the SOL WIRE 03 kit and screw this part to the ceiling in the correct position using suitable fixings.
Next thread the wire through the threaded part and screw into the ceiling cup leaving the wires hanging. With the help of a friend, hold the light frame in position and slide the loose end of the wire through the top of the glider and out of the hole in the side. You can now position the light at the correct height above your aquarium.
Simple as that!
Images: